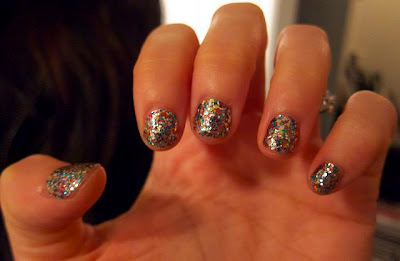
You're horrible at doing your own nails? - My left hand is apparently USELESS when it comes to putting on nail polish.
You love nail designs, but there's no way you are going to take the time or effort to draw on each nail?
You hate waiting for your nail polish to dry? - Impatience always leads to smudges and cursing for me.
You appreciate nail color that will last up to ten days?
So either you are totally a fan of Sally Hansen Salon Effects Nail Polish Strips or you just haven't tried them yet (silly girl)!
 |
| Photo Credit: sallyhansen.com |
These nail strips are made from real nail polish and come off easily with nail polish remover! (Although as always with glitter, you might have to put more elbow grease into it....hey, arm workout!)
It's not difficult to get pretty results. You just peel the backing off both sides of the nail strip and slap it on. Then you just rub off the remaining part of the strip with the pink side of the file and voila!
 |
| Photo Credit: chic-steals.com Nail Design: Bling It On |
If I made it sound super simple, it's because it really is. These strips are super forgiving. You can easily pull and stretch the strip to cover your nail and rub off any extra hanging material.
I'm wearing Frock Star here. I have small nails and like to keep them super short so I am including photos of Salon Effects on longer nails.
 |
| Photo Credit: FabFatale.com Design: Misbehave |
 |
| Photo Credit: absoluteacetone.tumblr.com Design: Check It Out |
 |
| Photo Credit: vaingirlmemoir.com Design: Laced Up |
*If you have smaller/shorter nails, you can probably use half the set by cutting the strips. Try to use what you can before you open the second vacuum sealed set. Once the seal is broken, it's best to use the strips right away or they get hard. (yes, that's what she said.)
*Rubbing the strip with your fingers onto your nails creates warmth that seems to make them adhere better. The warmth also helps stretch the strip to perfectly fit the curves of your nails.
*Always make sure you take off both sides of the backing on the strips. People tend to forget to take the clear backing off.
*Keep your nails away from water for a couple of hours. Washing hands gently should be fine, but shampooing your hair right away may lead to them coming off. They seem to stay on better after they've had time to "settle" on your nails.
Have fun feeling like you have DIY nails!!

No comments:
Post a Comment